I have been waiting for my order from the RepRap store to be filled with one of the key items on the order being the Nichrome wire.
So Buzz’s blog entry about using ceramic resistors and one of his replies to the comments resulted in this experiment.
http://builders.reprap.org/search?q=ceramic+resistors+as+a+low-tech+heater+element
His test rig was two 10watt resistors and he had suggested using four five watts resistors instead.
It seems that there is exactly one store left in the Seattle area that is selling components that is run by a number of retired guys; old hams, etc. Anyway after digging though their surplus bins and sorting lots and lots of resistors I managed to come up with two five ohm and two six ohm resistors; which I plan to put the like resistors in parallel and then the two groups in series.

The ideas occurred to me to sand off one corner of each resistor and have it surround the machined heater barrel that I got from reifsnyderb.
http://forums.reprap.org/read.php?94,18969
Which I managed to do and I have the following result.

While I am happy with my end result this was a bit more work then I had anticipated.
- First up I used a belt sander with a fairly course grit belt and it still took a long time to sand the edges off. This ceramic is really tough stuff! At you can see I did it by hand so things are not too even. I could have made a jig to hold the resistors as I sanded them.
- You have to hold the leads; if you let them vibrate they soon break the cement and start rotating at which point the heat transfer/magic dust inside starts leaking out.
- The cross section on the resistors are not square; so you really have to keep track of which edge is which, especially when you start twisting the leads together!
I had an opps where one of the resistors that the magic dust leaked out of. It then fell apart after twisting and un-twisting the wires after making mistakes with the orientation.

As you can see from picture there is a wire wound resistor in the center of the shell, letting the air in might cause it to burn out. We will see as I have one resistor that some of the magic dust has escaped from in my quad pack.
Ok back to putting everything together. Rather then use JB Weld like Buzz did I decide to try heat sink compound so that I could salvage my barrel if it didn't work out.

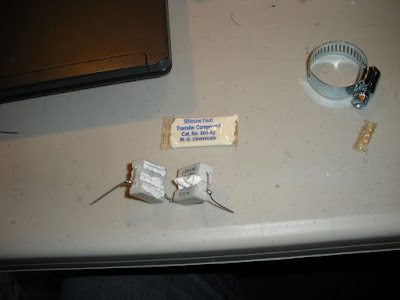

As you can see from the last picture it almost seems that the heater barrel was designed for this!
To mount the 100K Thermistor on the nozzle I once again visited the sander to file the back side with a flat area and then a notch on the face for the hold down wire that I wrapped around the nozzle. I then used more of the heat sink compound to fill in the gaps.
The power resistors and thermistor are simply secured with twisted copper wire. So it’s easy to take back apart again if necessary.

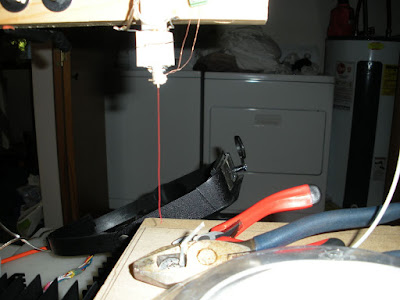
Getting ready for extrusion tests; after coding up the test routine I discovered my PWM driver board isn’t working correctly so I got to figure that out.
So in the meantime I clamped it to ExMrCleans temporary Z axis arm.

Fixed my PWM driver board this morning, it turns out I got one of the kits with the 100K resistor instead of the 1K’s and didn’t pay attention to the third color band. I must be really getting old as I sure remember resistors being easier to change!
Anyway fired it up and it seemed to climb at a fairly rapid rate, it reached a maximum temperature of 227C with no insulation.
My very first Fiber!
Another item I have been wait from the store is the ABS reel. So in the meantime I decided to live dangerous and experiment with weed wacker cord. They had lots of various white and green cords but I decided to go for Red.

This is what I picked up from the Garden department at the local Fred Meyer, have no idea of what kind of plastic that it is, it measures out to 2.7mm.
After the temperature passed 200C I got a bit impatient and inserted the weed cord and heard some crackling sounds; when I pull it out it sort of looked charred.
So I figure opp’s wrong type of plastic to use and then tried melting it and some white cord (2mm) on the soldering iron shank with the iron turned down to 250C on it’s dial.
The white appeared to melt better so I then inserted that and then started getting red fiber out of the nozzle from my first insertion.
The fiber measured between 0.5mm and 0.6mm out of what I think is a 0.4mm hole that reifsnyderb has in his machined tips.
Further thoughts
- While it did take a bit to do the sanding I am fairly happy with my results.
- My initial thoughts were that the barrel should be a square so that you can simply butt the resistors to the sides. It looks like nophead has come up with a better approch (naturally).
http://hydraraptor.blogspot.com/2009/01/yet-another-quick-heater-hack.html
It does take a bit of fource to hand extrude and it started slipping out of my temporary clamp so going to hard mount it after I come up with a better mount.

Interesting that there is a usable element inside. I had imagined they would be potted with ceramic cement.
ReplyDeleteI opened one up here and it seemed to be filled with red sand. The element inside is much smaller. We could drill a small hole in an AL block and cement one in to make a very compact heater.
It's nice to keep the thermal mass and surface area small for fast response but not essential.
There is a bit of lag using these which I image is the delay though the sand.
ReplyDeleteIt might also be interesting to open a 10watt and see what the size of the element is.
The Silcone heat transfer compound that I used seemed to work well. It was easy to take everything back apart and clean it up.
The electronics store had a whole jar of them. They are marked Cat. No. 860-4g M.G. Chemicals.
very nice idea
ReplyDeletethe only issue i see is using the silicone TIM. i use to do testing on thermal compounds from the cheap silicone based compounds to the experimental diamond compounds. The oils in these compounds are not designed for high temperatures usually beyond 150c and will separate and dry up in a short time.
if you wanted to look for something that would last longer, look for TIMs that use a metal-oxide like zinc/aluminum oxide rather than silicone. they will be rated higher, but are usually more expensive.
And also i believe the weed trimmer is made out of nylon.. not sure how that melts
Yeah I have already discarded weed trimmer cord and bugged Zach to take the back ordered items off of my current order and get it shipped so I can have ABS by next weekend.
ReplyDeleteI will have to see about long term, have done about four cycles so far and it doesn't appear to be drying out at all as I keep wiping it off my fingers everytime I handle it.
I think you are right about it being nylon as it left a nasty hard sleeve inside that I had to use a coat hanger to ram it out of the barrel when I cleaned it.
The hardest part of the cleaning was getting the heat sink compound out of the threads of the barrel; but a heck of a lot easier then if I had tried something like JB Weld.
I have repeated your experiment with regard to "sanding the corner off the resistors", and I've found that by using my angle-grinder with a "stone cutting disk" attached, I can grind the corner/s off like butter. takes about 20 seconds per resistor, even less with practice, or a jig I'm sure.
ReplyDeleteHi Fred,
ReplyDeleteYou sent a comment to ooeygui.com, but the email address was invalid. Can you resend with the correct email? (really wanted to reply, but variations kept bouncing)
Mr. Clean and gang,
ReplyDeleteI'm just starting in on my own extruder, and I much like you could not wait for an order of nichrome wire to arrive.
Sooooo...
I went to the local thrift store, and bought a curling iron for 25 cents, took it apart and found 6 feet of glorious .005" nichrome wire!
For those that are counting, that's about $0.04 per foot verses $.60 per foot from RRF store.
I just finished my first heater core. My resistance was a bit high, so I'm rebuilding it, but it works great!
I also scored some high temp furnace cement for Ace for under $3.00. So my heatering element (while time consuming to wrap and dry) is only costing me a couple of bucks. (i'm milling my own parts from scraps to save money there too)
Cool! you did a great job keep experimenting explore your knowledge and don't forget to share us.I want to share western boots for your style.
ReplyDeleteI will prefer this blog because it has much more informative stuff.www.transparentc.com
ReplyDeleteKeep the balls rolling!! Nice posts you have given for us.payday advance
ReplyDeleteKeep the balls rolling!! Nice posts you have given for us.orogold cosmetics
ReplyDeleteKeep the balls rolling!! Nice posts you have given for us.car insurance quotes
ReplyDeleteYou fully match our expectation and the selection of our data.payday loans
ReplyDeleteEvery week-end I used to pay a fast visit this site, because I’d like enjoyment, because this web site conations certainly fussy material.
ReplyDeletebest universal remote
I have checked this link this is really important for the people to get benefit from.
ReplyDeletebest universal remote